The 3rd Age

The Dwarf Holds

The Dwarf Holds

This mod adds a fully functional Dwarf faction to the game. Based on the now-defunct RA mod.

Button for The 3rd AgeButton for The Dwarf HoldsButton for The Elven AllianceButton for Helm's Deep Last HopeButton for GothmogtheOrcButton for BFME+Button for The Four AgesButton for HDR HeadquartersButton for Middle Earth CenterButton for Project Perfect Mod

Become an affiliate!


Quick Lists

Top Rated Popular New Updated Last Comments Users

Register and log in to move these advertisements down

Living World Map Graphics Deconstruction

Avatar of Nertea

Nertea

Category: Graphics
Level: Expert
Created: Sunday April 26, 2009 - 23:46
Updated: Sunday April 5, 2015 - 15:28
Views: 24291
Summary: Some notes on the function of various graphical parts of the Living World Map

Rating

Staff says

5.0

Members say

5.0

Average

5.0/5.0

14 votes

Page 1 2 3 4 5 6 7 8
Regions


Regions are the second interactive LWM element. They're quite important as are the drivers of the actual campaign - you want to control all the regions! Contrary to what you might expect, they are not controlled by livingworldregions.ini at all, but rather by the individual campaign files (gondorcampaign and mordorcampaign.ini). There are three w3ds involved, a Fill region (for selecting and the region fills, standard is LMR_(side)_Fill,w3d), an Edge region (for those edges that pop up on mouseover, LMR_(side)_Edge.w3d) and a Border region which contains outlines of the regions (LMR_(side)_Brdr.w3d).

Region General Comments and Code

              
Code
LivingWorldRegionCampaign    MordorCampaign


This bit defines the beginning of the region code. It has two sections: general art parameters and region definitions. However, there's an insanely important piece of code here...

              
Code
    ZOffset            = 157    


This tells the came where to put regions, armies, and anything else without a directly specified Z-coordinate. It works this way: the 'bottom' of the LWM is automatically set at the lowest point of all the objects contained in livingmap.w3d. This is usually the seafloor. This is where the grid is created initially. If you want your regions and various armies to appear on the surface instead of below it, you will need to offset it using this Zoffset. So, if your seafloor was at say, Z=-150 and your land surface was at Z=-50, you would need to apply a Z-offset of 100 to get armies to walk on the surface. This will become very difficult to get right if your land surface isn't flat, which is why I earlier recommended that you keep all areas with walkable regions at the same elevation.

Also pay attention to the line:

              
Code
    RegionObject            = LMR_Evil_Fill    


This line tells the engine which W3D to use for mouseovers in code.

The next big chunk of code talks about what happens when you mouse over a region. I'll go over that now and explain as best I can.

              
Code

RegionPopupDefaultColor = R:246 G:246 B:147 A:128
    RegionPopupOverColor = R:246 G:246 B:147 A:255
    
    RegionConqueredSound = Gui_RegionConqueredEvil


These tell you things about the conquered effects for a region. When you conquer it it will pop up a message relating to the conquest; this code lets you define the colour and sound that plays when this occurs. Standard RGBA values.

              
Code
    
    EnemyBordersEffect
        Geometry        LMR_Evil_Brdr
        ControlPoint
            Position X:0.248 Y:0.211 Z:0.043        ; 1/4 yellow
            Time 0.0
        End
    End
    
    FriendlyBordersEffect
        Geometry        LMR_Evil_Brdr
        ControlPoint
            Position X:0.2 Y:0.0 Z:0.0        ; RGB values of color
            Time 0.0
        End
    End
    
    HilightBordersEffect
        Geometry        LMR_Evil_Brdr
        Geometry        LMR_Evil_Fill
        ControlPoint
            Position X:0.0 Y:0.0 Z:0.0        ; RGB values of color
            Time 0.0
        End
        ControlPoint
            Position X:0.248 Y:0.211 Z:0.043        ; 1/4 yellow
            Time 0.5
        End
    End


This code chunk defines the border effects for regions.

For each there's a set of basic commands: Geometry controls the object used, by w3d name. You can have multiple Geometry entries, they will all be affected by the effects in that case. ControlPoint allows the animation of the colour used in the geometry object. Each controlpoint needs a Position and a Time. Position has an X, Y and Z value that correspond to R, G and B values. They are on a scale from 0 to 1 where 0 = 0 and 1.0 = 255. Time is in seconds. The engine will interpolate the XYZ values between each control point, so you can animate the colour. Note that as the shader used is additive, black will be transparent.

For a Friendly region belonging to the player, this code says that the Border w3d will be used. It will always (Time 0) be a colour defined by the position (in this case reddish).

For an Enemy region belonging to the computer, this code says that the Border w3d will be used. It will always (Time 0) be a colour defined by the position (in this case yellowish).

For a region Hilight (when you click on a region), both the Border and Fill w3ds will be used. They will start at black (transparent) and increase to a yellowish colour by Time = 0.5.

              
Code

    ConqueredEffectEvenglow
        Geometry        LMR_Evil_Edge
        Geometry        LMR_Evil_Fill
;        Opacity            0.4
        ControlPoint
            Position X:0.0 Y:0.0 Z:0.0        ; RGB values of color
            Time 0.0
        End
        ControlPoint
            Position X:0.2 Y:0.0 Z:0.0        ; RGB values of color
            Time 0.5
        End
        ControlPoint
            Position X:0.2 Y:0.0 Z:0.0        ; RGB values of color
            Time 5.5
        End
        ControlPoint
            Position X:0.0 Y:0.0 Z:0.0        ; RGB values of color
            Time 6.0
        End
    End

    ConqueredEffectFlareup
        Geometry        LMR_Evil_Edge
        Geometry        LMR_Evil_Fill
;        Opacity            0.4
        ControlPoint
            Position X:0.0 Y:0.0 Z:0.0        ; RGB values of color
            Time 0.0
        End
        ControlPoint
            Position X:0.0 Y:0.0 Z:0.0        ; RGB values of color
            Time 3.0
        End
        ControlPoint
            Position X:1.2 Y:0.4 Z:0.4        ; RGB values of color
            Time 3.1
        End
        ControlPoint
            Position X:0.2 Y:0.0 Z:0.0        ; RGB values of color
            Time 3.2
        End
        ControlPoint
            Position X:0.2 Y:0.0 Z:0.0        ; RGB values of color
            Time 3.22
        End
        ControlPoint
            Position X:0.2 Y:0.0 Z:0.0        ; RGB values of color
            Time 5.5
        End
        ControlPoint
            Position X:0.0 Y:0.0 Z:0.0        ; RGB values of color
            Time 6.0
        End
    End


This code controls the effects playedon the region when conquered. There is a flare up and a flashed glow. In the latter's case over 6 seconds the Edge and Fill w3ds will flash red. In the former's case there will be a more complex red flare.

              
Code
    
    MouseoverEffectFlareupOwned
        Geometry        LMR_Evil_Edge
        Geometry        LMR_Evil_brdr
        ControlPoint
            Position X:0.0 Y:0.0 Z:0.0        ; RGB values of color
            Time 0.0
        End
        ControlPoint
            Position X:1.2 Y:0.4 Z:0.4        ; RGB values of color
            Time 0.15
        End
        ControlPoint
            Position X:0.2 Y:0.0 Z:0.0        ; RGB values of color
            Time 0.4
        End
        ControlPoint
            Position X:0.2 Y:0.0 Z:0.0        ; RGB values of color
            Time 1.0
        End
    End
    
    MouseoutEffectFlareupOwned
        Geometry        LMR_Evil_Edge
        Geometry        LMR_Evil_brdr
        ControlPoint
            Position X:0.2 Y:0.0 Z:0.0        ; RGB values of color
            Time 0.0
        End
        ControlPoint
            Position X:0.0 Y:0.0 Z:0.0        ; RGB values of color
            Time 0.5
        End
    End


This section controls effects played when the player mouses over a friendly region. The two components control the animation played when the mouse moves over, and then when the mouse moves away.

              
Code

    MouseoverEffectFlareupContested
        Geometry        LMR_Evil_Edge
        Geometry        LMR_Evil_brdr
        ControlPoint
            Position X:0.0 Y:0.0 Z:0.0        ; RGB values of color
            Time 0.0
        End
        ControlPoint
            Position X:0.992 Y:0.847 Z:0.172        ; yellow
            Time 0.15
        End
        ControlPoint
            Position X:0.165 Y:0.141 Z:0.028        ; 1/6 yellow
            Time 0.4
        End
        ControlPoint
            Position X:0.165 Y:0.141 Z:0.028        ; 1/6 yellow
            Time 1.0
        End
    End

    MouseoutEffectFlareupContested
        Geometry        LMR_Evil_Edge
        Geometry        LMR_Evil_brdr
        ControlPoint
            Position X:0.165 Y:0.141 Z:0.028        ; 1/6 yellow
            Time 0.0
        End
        ControlPoint
            Position X:0.0 Y:0.0 Z:0.0        ; RGB values of color
            Time 0.5
        End
    End


This section controls effects played when the player mouses over an enemy region, despite the "contested" name. The two components control the animation played when the mouse moves over, and then when the mouse moves away.

That's the end of that bit, it's relatively simple keyframe interpolation for colour. Now, onto the next section of the file that actually defines the regions.

              
Code

Region Gap_of_Rohan
        DisplayName                    = LW:DisplayNameGapofRohan
        ConqueredNotice                = APT:LivingWorldRegionConqueredNotice
        MapName                        = "MAP SPS EVIL Gap of Rohan"
        MovieNameFirstTime            = EvilGapOfRohan_Intro
        MovieNameRepeat                = EvilGapOfRohan_Intro
        SkirmishStillImage            = Skirmish261_RT_R1
        SkirmishVoiceTrack            = EvilIntroGapOfRohan1
        SkirmishMusicTrack            = BaEvil09
        SubObject                    = T4
        RegionPortrait                = MPGapOfRohan
        DisplayActNum                = 3
        MissionObjectiveTag         = SCRIPT:OBJECTIVESPSVsGood01
        BonusMissionObjectiveTag    = BONUSROUND:SPSEVILGAPOFROHANDESTORY    ; Bonus: Destroy the refugee camps.
        BonusMissionObjectiveTag    = BONUSROUND:SPSEVILGAPOFROHANBUILD     ; Bonus: Build 4 lumber mills.
        CustomCenterPoint            = Yes                ; use a custom center-point
        CenterPoint                    = X:182 Y:493        ; custom center point in world-coordinates
        UnpackCamps                 = Yes                
        ConnectsTo                    = Isengard Enedwaith Eaves_of_Fangorn Fords_of_Isen Westfold
        ArmyBonus                    = 25
    
        ;////////////////////////////////////////////
        ;// Skirmish map opponent data        
        ;////////////////////////////////////////////
        SkirmishOpponent
            Name                =    Rohan_Tutorial        ; Build Limits - Warg Pit, Siege Works, Pikemen
            Faction                =    FactionRohan
            StartPosition        =    1
            TeamID                 =    1
            AllowInActs            =    Three
        End
        SkirmishOpponent
            Name                =    Rohan_DL1            ; Build Limits - Warg Pit, Explosive Mine
            Faction                =    FactionRohan
            StartPosition        =    1
            TeamID                 =    1
            AllowInActs            =    Four Five Six
        End
        SkirmishOpponent
            Name                =    Rohan_DL2            ; Build Limits - Explosive Mine
            Faction                =    FactionRohan
            StartPosition        =    1
            TeamID                 =    1
            AllowInActs            =    Seven Eight Nine
        End
        SkirmishOpponent
            Name                =    Rohan_DL3
            Faction                =    FactionRohan
            StartPosition        =    1
            TeamID                 =    1
            AllowInActs            =    Ten Eleven Twelve Thirteen Fourteen Fifteen Sixteen Seventeen Eighteen
        End
        SkirmishOpponent
            Name                =    Rohan_DL4
            Faction                =    FactionRohan
            StartPosition        =    1
            TeamID                 =    1
            AllowInActs            =    Nineteen Twenty Twenty_One Twenty_Two Twenty_Three Twenty_Four Twenty_Five Twenty_Six Twenty_Seven Twenty_Eight Twenty_Nine Thirty Thirty_One Thirty_Two Thirty_Three Thirty_Four Thirty_Five Thirty_Six Thirty_Seven Thirty_Eight Thirty_Nine
        End
        SkirmishOpponent
            Name                =    Refugee_Camps
            Faction                =    FactionRohan
            StartPosition        =    0
            TeamID                 =    1
            AllowInActs            =    Two Three Four Five Six Seven Eight Nine Ten Eleven Twelve Thirteen Fourteen Fifteen Sixteen Seventeen Eighteen Nineteen Twenty Twenty_One Twenty_Two Twenty_Three Twenty_Four Twenty_Five Twenty_Six Twenty_Seven Twenty_Eight Twenty_Nine Thirty Thirty_One Thirty_Two Thirty_Three Thirty_Four Thirty_Five Thirty_Six Thirty_Seven Thirty_Eight Thirty_Nine
        End
        SkirmishOpponent
            Name                =    Player_Animal
            Faction                =    FactionCivilian
            StartPosition        =    3
            TeamID                 =    1
            AllowInActs            =    Two Three Four Five Six Seven Eight Nine Ten Eleven Twelve Fourteen Fifteen Sixteen Seventeen Eighteen Nineteen Twenty Twenty_One Twenty_Two Twenty_Three Twenty_Four Twenty_Five Twenty_Six Twenty_Seven Twenty_Eight Twenty_Nine Thirty Thirty_One Thirty_Two Thirty_Three Thirty_Four Thirty_Five Thirty_Six Thirty_Seven Thirty_Eight Thirty_Nine
        End
        SkirmishOpponent
            Name                 =    SkirmishIsengard    ; Skirmish named player that exists in the map.
            Faction                =    FactionIsengard        ; Faction of the player, has to match the named player
            StartPosition        =    2
            TeamID                 =    2
            IsPlayer            =    Yes                 ; Specifies if this opponent is the human player
        End
        
    End


There is one of these for each region. Looks intimidating, but it's pretty simple. I'm only going to discuss a few of these in detail as the rest are pretty campaign-specific.


  • DisplayName: the string that is used to name the region
  • ConqueredNotice    : the string to display when the region is conquered by the player
  • MapName: the name of the map to load
  • MovieNameFirstTime: The movie to play on the loading screen when played the first time. defined in video.ini
  • MovieNameRepeat: The movie to play on the loading screen when played again
  • SkirmishStillImage: the image to show when loading the map. Found in mappedimages\handcreated\handcreatedmappedimages.ini
  • SkirmishVoiceTrack: the sound to play when loading, defined in video.ini
  • SkirmishMusicTrack: music to play during the map
  • SubObject: The subobject in the Geometry that this region uses. The engine will look for this subobject in the Fill, Border and Edge layers so it is important to be consistent in your naming between each W3D
  • RegionPortrait: the portrait shown in the palantir for the region. Like any palantir image, it's defined elsewhere. In mappedimages\aptimages\mapregionportraits.ini to be precise
  • DisplayActNum: regions display the act they can be accessed in in the palantir
  • MissionObjectiveTag: string to indicate the standard objective
  • BonusMissionObjectiveTag: string to indicate the bonus objective
  • CustomCenterPoint: specifies whether a region needs a custom center point or not
  • CenterPoint: This center point is where an army reaching this region will travel to (XY coordinates)
  • UnpackCamps: do we unpack the camps in skirmish
  • ConnectsTo: the other regions that this one connects to and therefore allows passage.
  • ArmyBonus: the command point bonus when a region is conquered. There are similar entries for PP and resource bonuses
  • SkirmishOpponent: Each one of the entries enables or disables various AI or player armies in the skirmish. Pretty self-explanatory.


Ok, enough code. The actual geometry will be discussed next.

Region Borders

Borders are the rings around regions. When modeling new regions, it's easiest to start with these.

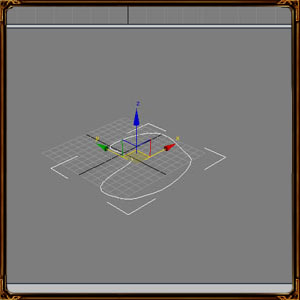
Using a Line spline, draw the border of your region in the top viewport. Make sure to Close Spline when it asks you to.
User image


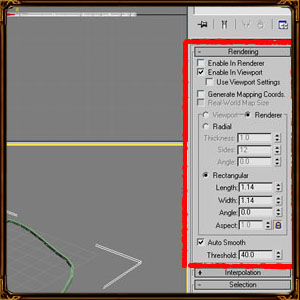
Open up the Rendering panel and Enable in Viewport. Set to Rectangular and then lock your Aspect Ratio at 1. Size the rectangle so that it works for your border size.
User image


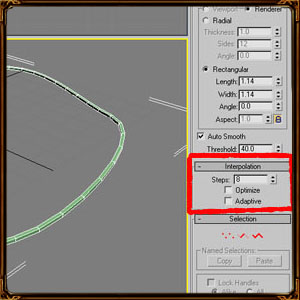
Open up the Interpolation panel, disable Optimize and Adaptive. Set the Steps to something that makes it look decently smooth.
User image


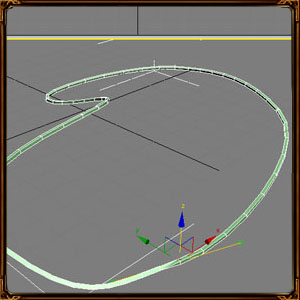
Now, this is essentially your border object. Using Editable Spline you could shape it to terrain if necessary. Name the object something like 'R01'
User image


The material for this object is reasonably simple, and does not even require mapping. You can extract it with WDump or use the settings I provide here:
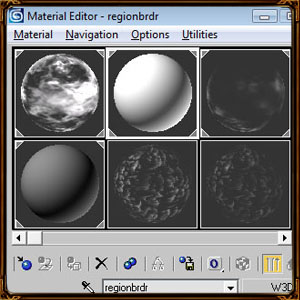
User image


Region Edges

Edges are a bit more difficult. To begin, save your file as a copy. Then, hit ctrl-V and copy your spline (keep the name the same!).
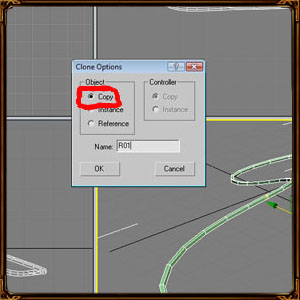
User image


Hide one copy, you'll need it later for the Fill.
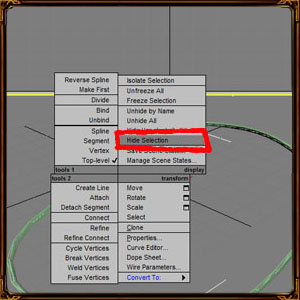
User image


Now, convert the spline to an editable poly.
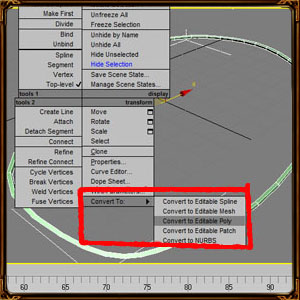
User image


Using face selection, select all the faces at the "top' of the spline.
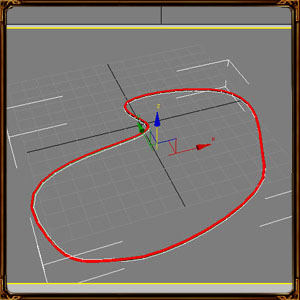
User image


Now, using the move tool, move these faces up a bit.
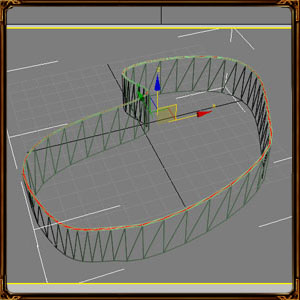
User image


Now go to vertex selection and select the moved vertices
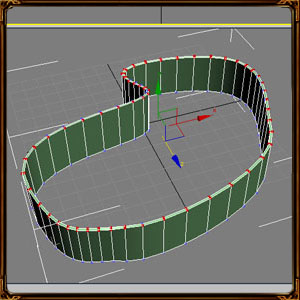
User image


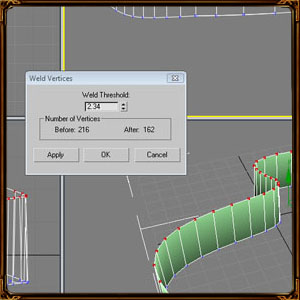
The Weld tool is used to connect the top rings. Set the Weld Threshold to whatever works for your border. This creates your edge object. To further refine it you can delete the hidden faces on the bottom of the triangle, or even delete the inside faces and set the W3D settings to 2-sided.
User image


To unwrap it, you could use a face map, just make sure it's facing the right way.
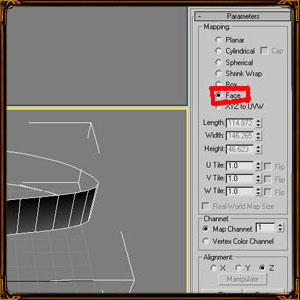
User image


The material here is more complex - scrolling and transparent. The settings I will provide here, but they aren't perfect so I recommend a Wdump check. Getting this one looking like the stock LWM edges requires precise mapping tweaking.
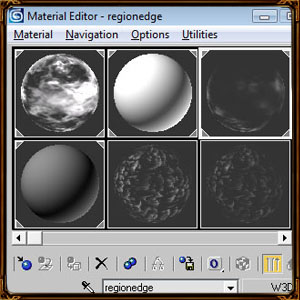
User image


Region Fills

The region fills are quite simple to do. First, load your original Border spline and untick the Enable in Viewport under Rendering.
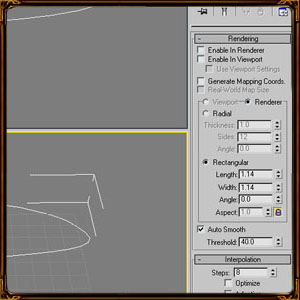
User image


Then add a Cap Holes modifier. 99% of the time this will do the job, but should it intersect with terrain you will need to use edit poly to modify the shape a bit.
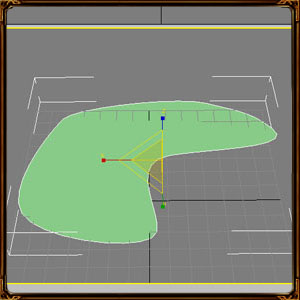
User image


To map, a simple planar map will suffice.
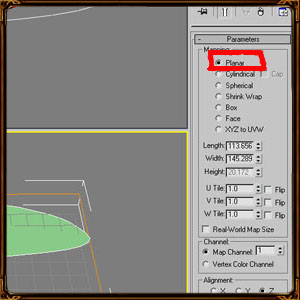
User image


The material in this case is also complex, but can be easily extracted with WDump (wow, I've said that at least 20 times). As usual, I'll give you my settings here
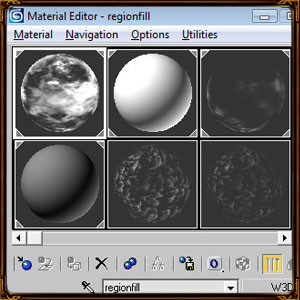
User image


That concludes the regions portion. There are one or two things to emphasize - 1) Naming of regions must be consistent across all 3 w3ds 2) the scale and extent of all regions must also be consistent.

Comments

Display order: Newest first

Sulherokhh (Team Chamber Member) - Tuesday April 28, 2009 - 9:26

Whosoever dared to rate this at '4' now has to explain what is missing for it to be rated '5'.
Or else the Lord of Skies shall smite him with Thunder and Lightning until only coals and ashes remain ....

Yup. You know that i am talking to ... :-#

Námo - Tuesday April 28, 2009 - 1:59

Excellent! and MOST welcome - lots of thanks to both of you!

Go to top


"One site to rule them all, one site to find them,
one site to host them all, and on the network bind them."

 
23:24:19